


Gradle for Eclipse - Android
Back to Android page
Importing from Android Studio into Eclipse
Welcome to raise issue on GitHub.
First, it is easier to create project with Eclipse-ADT, add build.gradle and import into Android Studio
by selecting that build.gradle, then other way around.
Single-project
see step 2 below
Multi-project
Step 1. Add .project file into root
<?xml version="1.0" encoding="UTF-8"?>
<projectDescription>
	<name>MyApplicationName</name>
	<comment></comment>
	<projects>
	</projects>
	<buildSpec>
	</buildSpec>
	<natures>
	</natures>
</projectDescription>
(you can also use Nodeclipse CLI )
e.g. from froject root C:\Users\username\AndroidStudioProjects\MyApplicationName run nodeclipse -g
Copy that path (e.g. in Android Studio “Copy Path” Ctrl+Shift+C),
in Eclipse File -> Import -> General / Existing Project into workspace

At this point, you don’t really need to have ADT. Eclipse is like Viewer,
but you already can launch Gradle build , installDebug or run on Device (when you have defined run task).
Further operation you can do within Eclipse. Just customize View to disable .* resources filter.
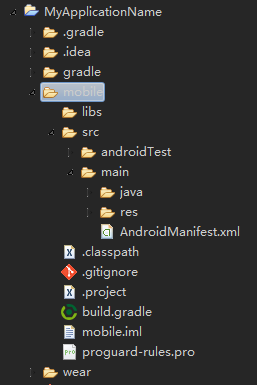
Step 2. For every module (as mobile or wear) do
2.1 Add 2 standard .files for Android project as below
(you can get them by creating new project with Eclipse-ADT,
only need to change "src" path="src/main/java"):
.project:
<?xml version="1.0" encoding="UTF-8"?>
<projectDescription>
	<name>MyApplicationName-mobile</name>
	<comment></comment>
	<projects>
	</projects>
	<buildSpec>
		<buildCommand>
			<name>com.android.ide.eclipse.adt.ResourceManagerBuilder</name>
			<arguments>
			</arguments>
		</buildCommand>
		<buildCommand>
			<name>com.android.ide.eclipse.adt.PreCompilerBuilder</name>
			<arguments>
			</arguments>
		</buildCommand>
		<buildCommand>
			<name>org.eclipse.jdt.core.javabuilder</name>
			<arguments>
			</arguments>
		</buildCommand>
		<buildCommand>
			<name>com.android.ide.eclipse.adt.ApkBuilder</name>
			<arguments>
			</arguments>
		</buildCommand>
	</buildSpec>
	<natures>
		<nature>com.android.ide.eclipse.adt.AndroidNature</nature>
		<nature>org.eclipse.jdt.core.javanature</nature>
	</natures>
</projectDescription>
.classpath:
<?xml version="1.0" encoding="UTF-8"?>
<classpath>
	<classpathentry kind="src" path="src/main/java"/>
	<classpathentry kind="src" path="gen"/>
	<classpathentry kind="con" path="com.android.ide.eclipse.adt.ANDROID_FRAMEWORK"/>
	<classpathentry exported="true" kind="con" path="com.android.ide.eclipse.adt.LIBRARIES"/>
	<classpathentry exported="true" kind="con" path="com.android.ide.eclipse.adt.DEPENDENCIES"/>
	<classpathentry kind="output" path="bin/classes"/>
</classpath>
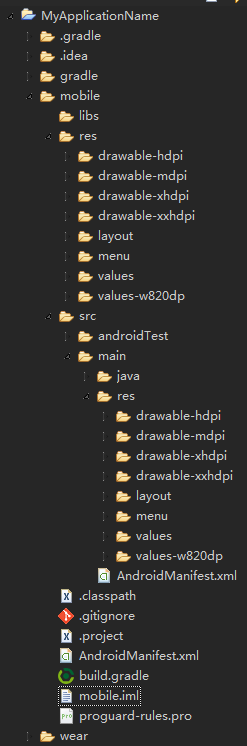
2.2 ‘assets’ and res folders, AndroidManifest.xml file
a) UPDATE: instead of symbolic links
it is much easier to move res folder and AndroidManifest.xml file
into app project folder
```groovy
sourceSets {
    main {
        manifest.srcFile 'AndroidManifest.xml'
        res.srcDirs = ['res']
        assets.srcDirs = ['assets']
    }
}
```
When it is not possible (e.g. other team members have not committed work), use older option below:
b) create OS symbolic links
On Lunix
ln -s src/main/res res
ln -s src/main/AndroidManifest.xml AndroidManifest.xml
On Windows I don’t yet know grace way that would work always:
http://stackoverflow.com/questions/26081449/symbolic-links-on-windows
mklink /D res src/main/res
mklink AndroidManifest.xml src/main/AndroidManifest.xml
Windows 7 has mklink util, but it just did not work on my PC.
I found a great Junction util
and could do junction res src/main/res, but for link to file is created .lnk file (aka Windows shortcut).
I discovered that Git Bash can execute ln -s src/main/AndroidManifest.xml AndroidManifest.xml but it creates copy, not link.
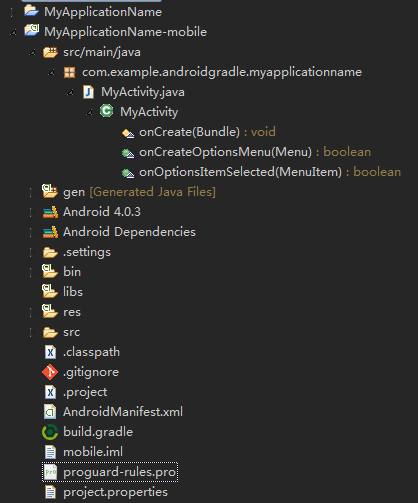
2.3 Add gen folder
2.4 add project.properties
target=android-15
2.5 Import as existing project
click on mobile , Ctrl+Alt+C
File -> Import -> General / Existing Project into workspace
DONE.
Of course limitations are:
- Eclipse is still using ADT to build (Why not? “To be able to use Gradle-based Android projects in Eclipse, someone will have to write an Eclipse plugin for it, which won’t be a trivial task.” answered by Scott Barta)
- dependencies added via gradle are not visible to ADT (but jars in
libsfolder are shared of course)
Good things are:
- you can use more stable Eclipse ADT for developing and debugging
- at the same time you can use and/or experiment with new build system in the same IDE as second one.